I know you all are curious about how the babies are doing with their foster Momma. They're are about a month old now and growing fast.
Aren't they cute?
Momma has been given a real name by the daughter of a colleague of mine. "I" named her Lola, which I think is an adorable and fitting name for her. Much better than the boring "Momma" I've been calling her!
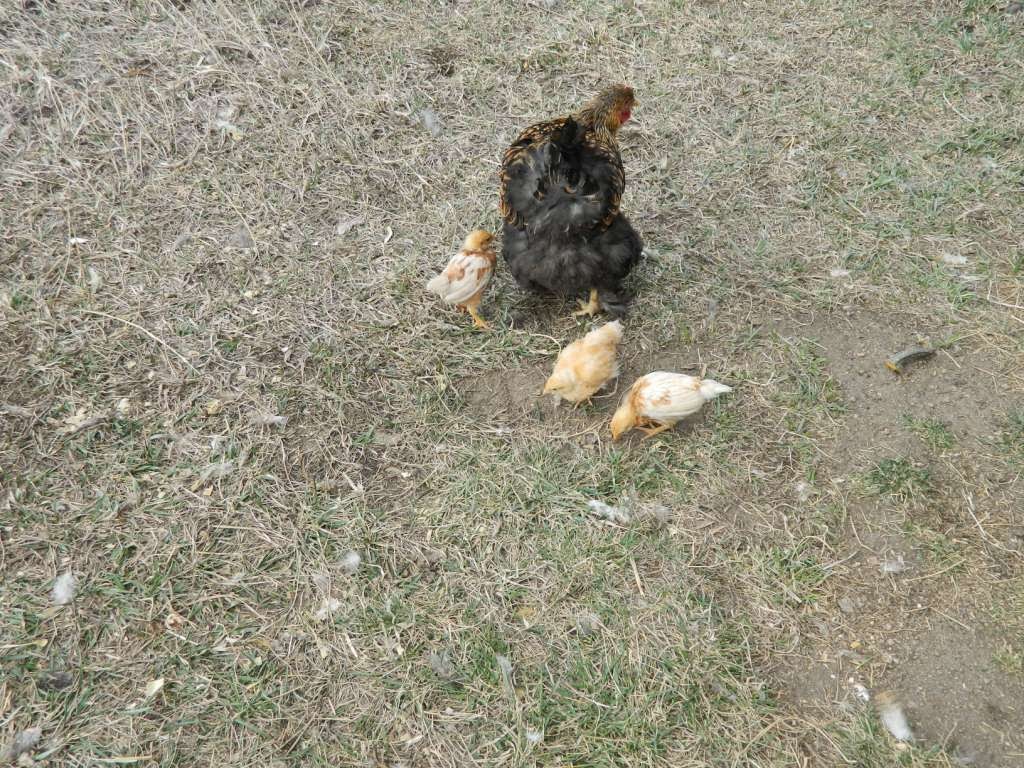
Lola has started taking her brood outside to free-range for short periods of time. The babies are growing up!
For the first time they have been mingling with the rest of the flock. I was afraid for them, since there's always the risk they'd be pecked to death by another chicken.
Happily, the flock pretty much ignored the babies. I only saw a baby get pecked one time. She was at the food when another hen came over to eat. The baby didn't move out of the way of the hen, so she got a peck on the back. That sent her running back to Lola, who seemed to say, "What did you expect when you don't yield to someone higher on the pecking order?"
Like all youngsters, they are learning their place in society and how to fit in.
DEEP LITTER
I've been using a technique called the "Deep Litter" (DL) method inside the chicken coop. Instead of cleaning out the bedding in the coop weekly or monthly, you just add more new litter on top of the old. The layers build up and compost right there on the coop floor. Coop cleaning happens only once or twice a year.
But doesn't it stink? Nope. Not if you're doing it right. If there is an ammonia smell, you don't have enough litter on the floor!
I use pine shavings on the coop floor. I started with about a 3" thick layer when I put Team Omelette in the coop back in July. My coop has a dirt floor, which is ideal for the DL method. But you can use DL with any type of coop floor.
All I do is add another couple of inches of fresh pine shavings every couple of weeks, or when it starts to look dirty in the coop. The fresh layer is added on top of the existing shavings.
An important part of the DL method is stirring up the bedding so the wet droppings can dry out. I'll rake it around myself sometimes, but it's easier to let the chickens do the work. Once a week, I'll throw some grain down on the floor. The Team busily scratches around to find the grain and in the process rakes the bedding for me. Cool huh?
If you start to notice an ammonia smell, your bedding is too wet. Throw some more bedding down, then rake it in to help dry things out.
Since I started the DL process in the summer, by the time winter set in there was a thick layer of litter on the coop floor. The composting action generates a small amount of heat, which keeps the inside of the coop five to ten degrees warmer than the outside air temp. Believe me, in the middle of a Colorado winter, those few additional degrees make a difference!
Now that it's time to get the garden ready for spring planting, it's also time to clean out the coop.
You can see how broken down and composted it all is.
Be sure to leave a thin layer of the old stuff so that the helpful microbes in it can get to work on all the new bedding and pooh that's about to be deposited.
I have a new ranch hand, "M", who came over to help me with this coop cleaning. We took four of these carts full of composted bedding out of the coop.
You can put all that old bedding into your compost pile. I'm simply digging it into the garden beds. It's mostly composted anyway.
There's still a small risk that the high nitrogen in the uncomposted, fresher pooh will burn the seedlings. It's a risk I'm comfortable with. There's not that much of it and it'll sit there for a few weeks to a month or so before anything is planted. I think it'll mellow out in that time and not burn the seedlings.
Now put down a nice layer of fresh bedding on the coop floor and start the DL process all over again.
Team Omelette loves it when there's a fresh layer of shavings in the coop. They busily scratch through to see if there's anything edible in it.
I'll let this build up through spring and summer then clean it out again in the fall. It doesn't get much easier than this! No more cleaning the coop every week. Using the DL method is really just composting inside your coop.
Along with my nifty feed and water systems, the DL method really cuts down on the amount of work it takes to keep a flock of chickens. Work smart, not hard!
Oh, if you decide the DL method is right for your flock, do not use diatomaceous earth or any pesticides in the coop. It'll kill off all of the helpful microbes and organisms that are working to compost the litter!
Good luck and let me know how it works for you.
There's no real reason for posting this photo of Kipp taking a siesta other than I think he's an awesome horse and riding partner!
I've been knitting for about four months now and can't imagine why I was ever intimidated by the thought of using two needles at once!
When I started knitting in the round, I made this cap for G.W. as my practice piece. I did it on a circular knitting needle.
In searching Pinterest for knitting patterns, I came across a technique called "Magic Loop". It's a way to knit small tubes like socks or mittens on one long circular needle versus double pointed needles. When using double pointed needles, you can end up with something called "ladders" where you switch from one needle to the next. It's tough to keep those transition stitches tight. The loose stitches are obvious, like rungs on a ladder. The Magic Loop technique eliminates that problem.
I found a very clear step-by-step guide to Magic Loop over on Tin Can Knits and got rolling.
You need one circular knitting needle at least 32 inches long.
I'm using this yarn for the example. It'll become the first pair of socks I'll try knitting.
Cast on the number of stitches you need for your pattern. I cast on 32 stitches for a test swatch. (which I'm using to determine gauge for the socks)
Slide all the stitches to the cable part of the needle, keeping the tail and your working yarn on the right.
Find the middle of your cast on stitches. Bend the cable and pull it to the left, through the gap between your stitches. Since I cast on 32 stitches, I pulled the cable through between stitches 16 and 17.
Pull the cable until your stitches are on the needle part. You'll have half of your stitches on each needle. Be sure to arrange your work so that the last stitch you cast on is on the back needle. This positions the working yarn on the back needle.
Now slide the stitches on the back needle to the cable part. This needle becomes your right hand needle.
Knit the stitches on the left needle just like you were using straight needles. It does look like knitting on double pointed needles, though. Knit all the stitches on the left needle.
Turn your work so the needles are pointing to the right.
Slide the stitches on the new front needle to the working position on the needle. Slide the stitches on the back needle to the cable part. Again, the back needle becomes your working, or right hand, needle.
Knit the stitches on the front needle. Now you've completed one round of your knitting.
That's all there is to it. You just keep knitting half, then sliding the stitches around on the circular needle to position them for working the other half of one round.
Yup, it looks confusing. There are weird loops of cable needle sticking out of both sides of your work. And it can be challenging at first to figure out how to turn your work and reposition the stitches on the cable. Trust me, it is easy once you get the hang of it.
I decided to make a neck gaiter for G.W. (to match his stocking cap) as my Magic Loop practice piece. After I was about two or three inches into it, the technique became second nature.
If somebody like me who has only been knitting for a very short time, can master the Magic Loop, you can do it, too! It's easy peasy! Give it a whirl, then come back and tell me what you think!
In the event you get yourself mixed up with the technique, you can go to your LYS (local yarn store) with your yarn and needles. It's almost guaranteed someone there is familiar with Magic Loop and can help you out.
Alternately, I can try to help you out through this blog. Use the comments section to contact me and I'll do what I can to walk you through it.
Have fun!
Part 1: Chicks
First, an update on Operation Chicken Little. It's an outstanding success!
The babies are very active and wanting to explore everything.
This afternoon, G.W. and I were in the coop refilling the feed hoppers. I needed the help because I threw my S1 joint out and I'm more or less an invalid right now. G.W. is an effective, but stern nurse!
Any-who, Momma Hen was pacing inside the isolation pen and acting very agitated. I thought maybe it was time to let her and the babies out to mingle with the flock. Since most of the flock was outside free-ranging, it was a good opportunity to see what Momma would do.
I opened up the little pen and Momma came right out. Alone. The babies stayed in. Momma stretched her legs, scratched around a bit, pooped, then went back into the pen with her babies. Interesting. All she seemed to want was a minute or two to herself. <All the human Moms are nodding in agreement right now>
One of the babies climbed up on their water jar to see where Momma went.
"All I want is some time away from those kids!"
I have another eight chicks on order for the first week in May. Say a prayer that I have another broody hen who is ready, willing and able to foster them!
Part 2: Chick with sticks
During the winter, I switch from my outdoor hobbies like gardening to indoor hobbies. I call them "chair hobbies" since they're things I do while sitting in a chair. (Usually while watching a movie) This winter I decided to learn how to knit.
I've been a crocheter since I was about 10 or 12 years old. I taught myself using a book from the 1940's that I inherited from my Great Aunt Margaret. But knitting always intimidated me a little. I think it was the idea of using two knitting needles. Some years ago, I learned how to do the basic knit and purl stitches but never took it any further.
This book, Fearless Knitting Workbook by Jennifer E. Seiffert, has been my guide. It's a wonderful tutorial where you make 8" x 8" practice squares with each lesson.
Within just a few weeks I'd completed these squares while learning to increase, decrease, read patterns and charts and use various cable techniques. I think I'm going to piece some of the squares together for pillow covers.
There are many other lessons in the Fearless Knitting Workbook that I haven't done yet. The ones on lace knitting look interesting!
Next up was a scarf for G.W. in the colors of his favorite football team, the Denver Broncos. It was just a simple ribbed pattern but gave me tons of practice with knit and purl stitches.
Piper likes to help me knit. She says, "If I only had disposable thumbs, I'd knit, too". I think she means "opposable" thumbs! But that doesn't stop her from playing hard with the yarn and knitting needles.
This is my first project knitting in the round. It's a stocking cap for G.W. made with Lion Brand Fisherman's Wool yarn.
I found the pattern for it on a blog called Hats for Israeli Soldiers. It's the pattern people use to make and donate wool caps for soldiers in the IDF (Israel Defense Forces).
The pattern is available in both English and Hebrew. Neat, huh?
G.W. teases me now with the nickname "Knit Wit". That came about because he asked me a question while I was counting knitting stitches and I answered him with louder counting. If you knit/crochet, you will understand that completely!
Now I'm trying a new knitting technique called Magic Loop. Come back next week for details on what it is, why people use it and how I'm coming along with learning it. (Hint: right now, it's not pretty. Not pretty at all!)
Also next week, using the "deep litter method" in the chicken coop.
Where has the ranch lady been?
My dear, patient readers! It's been months, I know. I am happy to be back and blogging. I almost gave this up for good, but so many of you said how much you miss following along with everything that goes on here at Crossed Sabers Ranch. Thank you! That means so much to me! I do love sharing with you!
It's winter, so honestly not much happens on the ranch.
Our flock of hens, Team Omelette, did get three additions. The details of Operation Chicken Little is below!
We've gotten some significant snow storms. This Bobcat has made our lives a lot easier. Piece of cake to clear the driveway! The enclosed cab keeps G.W. toasty warm and dry.
Winters here are long and sometimes hard.
They're also beautiful
Team Omelette is doing well. Through December and January they continued to give us between eleven and thirteen eggs every day. Over the last month, though, they've slowed considerably. Now we get between four and six eggs daily. Several of the hens have gone broody, which means they want to sit on a nest and hatch out eggs. Broody hens do not lay eggs. I've tried to gently discourage this broodiness by blocking off their access to the nest boxes at night.
There are advantages to the broodiness. Some broody hens will foster chicks that are not their own. One of the breeds in my flock, the Cochins, are well known for their mothering skills and most don't hesitate to quite literally take any chicks under their wings.
I'm testing this out with these three pullets we got at a local farm store. They are Buff Orpington pullets. ("Pullet" is a young female chicken).
OPERATION CHICKEN LITTLE
Under cover of darkness when all the chickens were sound asleep, I moved one of the broody Cochins from the regular nest box and put her into a small isolation pen I built inside the coop. She never noticed that she had been moved into another nest box.
Very early in the morning while it was still dark, I slipped the three babies underneath Momma. That's the technique to use when you want a hen to foster mother chicks. The hope is that they wake up in the morning, think they have hatched out some eggs and now have babies to care for.
In this case, I have a couple of things working against me. First, I've never tried this technique with any of my hens. Second, the pullets are already almost two weeks old. At that age, they may not bond with the hen. It's better to use chicks that are only a day or two old.
If the foster program doesn't work out, I am prepared to raise the babies myself. I still have the heat lamp and such from last spring when I got Team Omelette as day old chicks.
I've checked on the new Mommy hen every hour and so far, so good. She's all fluffed up with the three babies under her.
If the match works out, Momma and babies will stay in their isolation pen for five to seven days, then I'll let them out to mingle with the rest of the flock.
Momma Hen will protect the babies from any aggression from the flock. And the babies will learn to forage for food by mimicking Momma. Also, the babies will grow up integrated into the pecking order.
The babies are so darned cute when they peek out from under Momma's feathers!
Momma Hen is sitting tight on those babies. I tried to reach under her to feel for them. She let out a few alarmed squawks which brought Cogburn over to see what the heck was going on. Cogburn put himself between me and Momma as if to say, "Back off, lady!"
Which reminds me, a few weeks ago, Cogburn attacked me. He was justified. I had picked up a hen to move her off a nest box. She started hollering and Cogburn came at me full throttle. Luckily, I had on a heavy coat and gloves. He did get me once on the wrist at the gap between coat and glove. Drew blood but nothing serious. That's Cogburn's job. Protect the hens.
And so I bid you all, "Good night from Crossed Sabers Ranch!" May you rest as easily as if you were tucked in with Momma!