Wednesday, January 30, 2013

Smoked Pork Shoulder

I pulled out the big guns with the smoker last weekend and did a pork shoulder. At the risk of bragging up my own cooking, I think I could win a contest with this recipe!

The recipe comes from AmazingRibs.com. You can click here to jump over to the recipe.  AmazingRibs.com is a very cool website because it's a lot more than just recipes. There's reviews of products and discussions on the how's and why's of smoking/BBQ-ing/grilling foods. The recipes include the techniques used to help you produce great results.  

When I did my shopping for this recipe, I picked up a pork shoulder instead of the butt that's called for. Happily, it turned out yummy anyway! 


 The rub was made up of brown sugar, white sugar, kosher salt, paprika, garlic powder, ground ginger, ground black pepper, onion powder and rosemary powder.

You can't be shy when it comes to rubbing your butt (or shoulder)! Just roll up your sleeves and get right in there. A nice coating of oil helps the rub stick to your butt. It's important to rub your own butt. If you get into trouble rubbing someone else's butt, do not try to blame me! You're on your own.

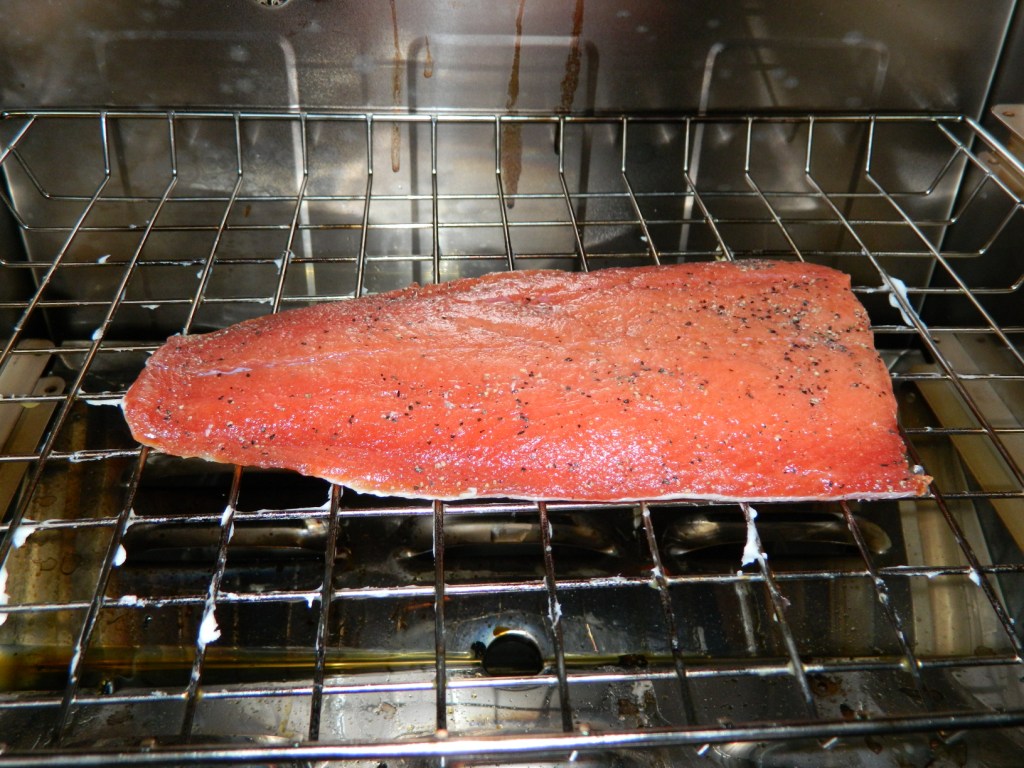
Butt, I digress...here's my well-rubbed butt...(or shoulder as the case may be!)

Before I become the butt of your jokes, I'll stop with the butt jokes.

The key to success in smoking something like this pork shoulder is a digital thermometer with a probe. The collagen (connective tissue) in in the meat needs to soften in order for it to be come tender. That begins to happen when the meat is at 170 degrees. It's not done though until it's at a minimum of 195 degrees. The digital thermometer allows you to monitor what's going on inside that hunk of meat while it's cooking. You can see the probe and wire coming out of the left side.)

(Pardon me for just one minute while I bite my tongue to keep from making another butt joke, since I'm using a thermometer with a probe.)

OK, I'm back.

Here's the thermometer monitor not long after I started cooking. The shoulder is at 46 degrees.

I chose pecan wood for the smoking. It's supposed to have a nice mellow and subtly sweet flavor. My Bradley Smoker uses these special bisquettes.

The nice thing about the Bradley smoker is that the temperature is easily regulated. For this recipe, you'll want to keep the temperature inside the smoker at between 225 and 250 degrees. 

After eight hours, the pork was at 196 degrees.


I stuck a fork in it and twisted it a bit to see if the meat was tender. It started to pull apart, so it was done.

There should be a way to electronically share the scent of this smoked pork. Words don't do it justice. 


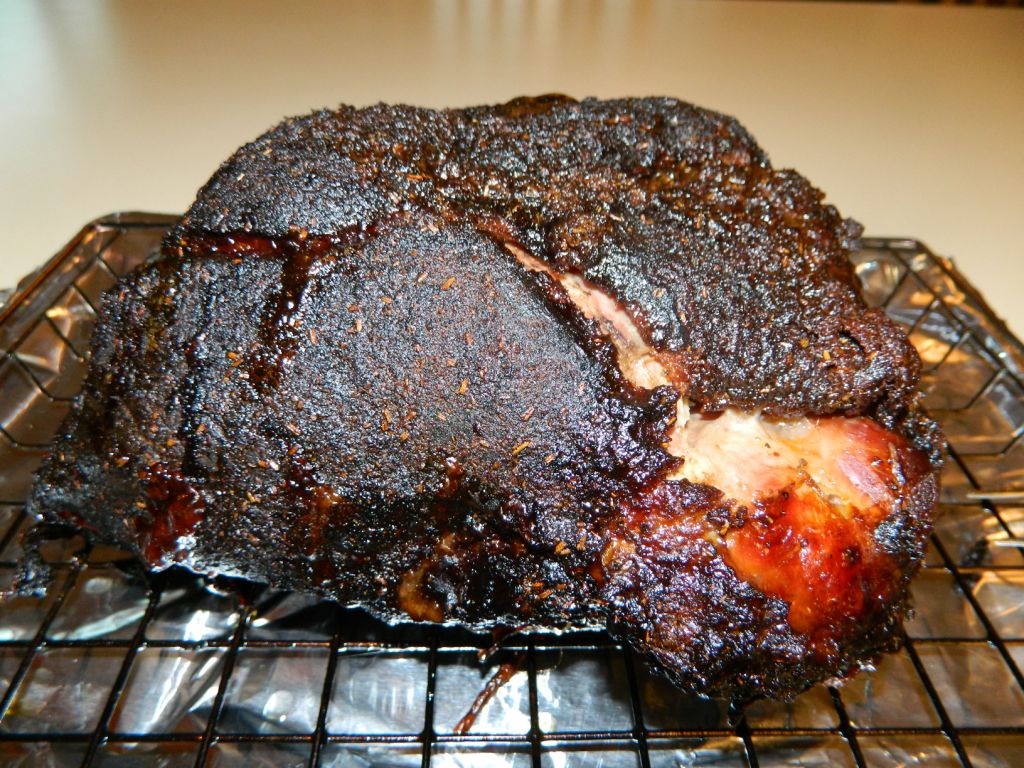
That dark crust on the outside is the best part. It's called the bark and is the hallmark of smoked meat. It's chewy, intensely flavored heaven, let me tell you! I love, love LOVE it!

The pork shoulder was juicy and falling-apart tender, just as it should be. All it took was some gentle shredding with two forks...


I resisted the extremely strong urge to keep all of the bark pieces for myself and mixed them in with the rest of the meat. It really kicks up the flavor. That didn't stop me from helping myself to some of the especially yummy-looking bits as I was shredding it, though. It's the cook's prerogative! That's my story and I'm sticking to it!

G.W. and I didn't even bother to get sandwich buns. We just piled the pulled pork into bowls, topped it with some of my secret recipe homemade BBQ sauce and stuffed our faces. I love being a carnivore!

This summer, I'm thinking I should find a BBQ contest and try my luck with this recipe! 

My next smoker project will be a brisket. Any Texans out there have some recipe suggestions?


Vehicle Preparedness and Safety


Guest author (and my very own hubster) G.W. has written a great set of guidelines for making sure your vehicle is stocked and ready to go in the event you need to get out of Dodge!


When talking about emergency preparedness and safety, your vehicle is one of your most important assets.  This summer there were numerous wild fires and how did people get out of the path?  In their vehicles.  A lot of people had very little notice as the fires swept over the ridge forcing them to leave their homes with just the clothes on their backs.  If you only had 5 – 15 minutes to grab what you could from your home before you had to flee, what would you take?  If your vehicle was already prepared and you had a personal survival kit already assembled then you might have time to gather up some family photos or other irreplaceable mementos.   

There are a number of good tips that can help keep you and your family safe as you navigate your way out of a natural disaster area.  I’ve attempted to list several of them in this article. 

Preparedness Kits.  In my humble opinion there are two types of preparedness kits you should have in your car at all times - a vehicle safety kit and a personal survival kit.  Below are some suggested items to include in each kit.  Items should be stored in airtight plastic bags inside storage containers.

Vehicle Safety Kit

  • Air Pump / Compressor
  • Battery-Operated Radio w/ Extra Batteries
  • Candles
  • Cigarette Lighter
  • Compass / GPS Unit
  • Duct Tape
  • Fire Extinguisher (ABC-Type)
  • Flashlight w/ Extra Batteries
  • Ice Scraper
  • Jumper Cables
  • Latex Gloves (At Least 2 Pair)
  • Light Sticks
  • Map of Area
  • Matches In Waterproof Container
  • Plastic Storage Bags (Zip Lock)
  • Radiator Stop Leak
  • Road Flares
  • Sand / Cat Litter for Traction on Ice / Snow
  • Shovel
  • Survival Knife
  • T-Style Lug Wrench
  • Tarp (6X6) (Can be used to make a temporary shelter or as a ground cloth to keep you dry)
  • Tire Chains
  • Tire Pressure Gauge & Fix A Flat
  • Tow Strap
  • Trash Bags (Construction Weight) (Can be used as an emergency poncho, to help keep your sleeping bag dry, or to gather and carry water.)

Personal Survival Kit

  • Blankets / Sleeping Bag
  • Cash, Coins For Phones
  • Cell Phone
  • First Aid Kit / Special Medications
  • Whistle
  • Toilet Paper / Towelette

  • Games / Books for Kids (if appropriate)
  • Infant Diapers and Wipes (if appropriate)
  • Infant Formula (if appropriate)
  • Personal Hygiene / Feminine Items 
  • Pet Supplies (if appropriate)
  • Food - Choose whole grain cereals, nuts, energy bars, peanut butter, and food with high liquid content; avoid food that makes you thirsty.  Any special diet foods.  Remember a portable can opener should you chose any canned foods.
  • Water - 1 gal/ person, for 24-hour period.
(Write date on all food / water, replace every 6 months.)
  • Spare Clothes - Gloves, hat, sturdy shoes, boots, wool socks, jacket, rain gear, etc. clothing that can be layered

How robust this kit will be for your particular vehicle may depend on several factors. You may want some or all of these items or none at all depending on the vehicle you drive, geographic location, and time of the year.  Keep in mind that during the winter there are other items that should be included, so your kit should be updated with the changing of the seasons.  I’ve tried to make this a simple, but complete list for a basic kit.  I readily acknowledge that this is not the end all list, but it should definitely be a good start.

Keep your vehicle gassed up and ready to go.  Try and maintain your vehicle at a minimum of ½ a tank. Whenever it drops below that it’s an easy and quick stop at the gas station to fill it back up.  Consider that in a natural disaster situation where everyone is trying to get away from the disaster area, the lines at the gas station may be long if the gas stations are even open at all.  It could be total chaos and if you are spending time trying to procure resources (such as fuel) that are in high demand instead of putting distance between yourself and the threat area (if that is the most desired course of action for you and your family), then you will have a much more difficult time escaping.

Maintain your vehicle.  This may seem obvious but in the rush of our daily lives sometimes things get pushed to the side, forgotten or procrastinated until the last minute.  Make sure you keep your oil changed, tires properly inflated, brakes in good working order, lights (headlights, high-beams, fog lights if you have them, turn signals, brake lights, tail lights etc) inspected and maintained. If there are any mechanical issues that you suspect could be a problem, try to address them early and get them taken care of immediately. You never know when disaster could strike and trying to fix your vehicle when you should be driving it, could cost you valuable time when you can’t afford to be sitting in place. In addition to keeping a survival kit in your car, also keep an emergency car tool kit.

Keep your doors locked.  This a good rule of thumb whether you are parked (to avoid unwanted visitors waiting inside when you are not in your vehicle) or whether you are driving.  If you are stuck in any type of traffic or situation where you are moving slowly and the door flies open with someone wanting to help themselves to a ride or more, it adds whole new level of complication to your evacuation plan.  

On a daily basis I could probably live out of my truck for 3 days and when I add in my emergency winter box that timeframe could extend out to about a week.  The most important factor in any disaster situation is to have a plan and include others who will be involved in helping to develop and accomplish the goals of that plan.  If you have other tips that you’d like to offer, please comment below. 

Tuesday, January 29, 2013

Smoked and Cured Salmon - The Taste Test

Although it's long over-due, here's the second part of my post on smoked and cured salmon.  

After two days of cold curing, the gravlax was ready to eat.  I took both the gravlax and the smoked salmon into the office where I work. My coworkers graciously agreed to be my guinea pigs!  One person brought the bagels and coffee; another brought the cream cheese.


The smoked salmon had a flaky texture very similar to poached or baked salmon. The gravlax had a softer texture and did not flake. It needed to be sliced very thinly. (Just as it should be.)


The flavors were superb, if I do say so myself. The gravlax tasted very much like what I've bought in stores. The smoked salmon had turned out just as I expected...pronounced smoke flavor balanced nicely with the flavors from the spices in the rub.

My coworkers surprised me because there wasn't a clear favorite. They liked both varieties equally!  And ate both in quantity!  Personally, I preferred the gravlax but only because I've always liked cold cured salmon better than smoked.

I'm still amazed at how simple it is to make both of these. No more store-bought gravlax for me!  Try it yourself and see...there's no going back once you've had homemade!

Sunday, January 13, 2013

Cured and Smoked Salmon

I have champagne tastes and a beer budget when it comes to food. I really, really enjoy smoked salmon and gravlax, but the prices can be exorbitant.  So these are treats I enjoy only on special occasion.

The other day, when the weekly sales circular for Sprout's Market arrived, I noticed that sockeye salmon was on special. That got me thinking about how hard it might be to make my own gravlax. And since we recently were gifted with a smoker, smoked salmon, too.

One of my favorite food and recipe websites is Cooking for Engineers. Their tag line is, "Have an analytical mind? Like to cook? This is the site to read!" It's a wonderfully quirky site that melds science and cooking.  

The site had a recipe for gravlax which looked so easy I was skeptical. All it takes is a piece of salmon, some kosher salt, sugar, black pepper, dill and a little bit of time. Interestingly, it takes virtually the same ingredients for hot smoked salmon.

The recipe for smoked salmon comes from the recipe booklet that was included with the Bradley smoker. (See the January 6, 2013 post for details on the smoker I'm using.)

Before you dive right in and buy a big ol' slab of salmon from the market, you need to understand that certain parasites like roundworms can live in salmon. Cooking salmon will kill them. But if you are curing them for gravlax, there's no application of high heat to kill the parasites. The way to ensure that you have safe salmon for gravlax is to either buy previously frozen salmon or freeze it yourself first. You must freeze it at 10 degrees below zero for a minimum of a week. Please take the time to educate yourself on safe processes before you attempt this (or any recipe) that you find here at Crossed Sabers.

The salmon I got was previously commercially frozen, so it is now completely safe.

First, you cure the salmon. The cure ingredients for 1 1/2 pounds of salmon are 3 Tbsp kosher salt, 3 Tbsp white sugar and 3 tsp. ground black pepper. You also need fresh dill. The same cure works for both the gravlax and the smoked salmon. The only difference in preparation is that the salmon for smoking gets a rub down with some vegetable oil before the cure is applied.

Both get wrapped in several layers of plastic wrap. 


Put them into a dish with sides because the cure will draw out liquid from the salmon. Then refrigerate.

The salmon for smoking needs to cure for 14-20 hours. The salmon for gravlax needs two to three days.

Here's the one for smoking after 20 hours. You can see how much liquid has come out. The texture of the fish is much firmer than when I put it in the cure.


Remove the dill and rinse off the cure. Pat the flesh side dry with paper towels.


I preheated the smoker to 100 degrees and dropped some Bradley's "Special Blend" Bisquettes into the smoker's hopper.
  

Of course the day I pick to do this little project brings nasty weather. It's 9 degrees and snowing hard. Ugh! I've got the smoker on the patio under the deck. It's only slightly sheltered from the weather. Good thing the Bradley doesn't need lots of attention and fussing! 

Grease the smoker rack, put the salmon in skin-side down and let it go for one hour at 100 degrees. 

Then, according to the recipe, raise the temperature to 140 degrees for one hour, then 175 degrees for one hour.

Here's what it looked like right out of the smoker. It's cooked all the way through, but the thin ends look dried out. 


I flaked off a little bit to taste and it was pretty good. Yes, it's just a tad on the dry side, unfortunately. It had a smoky flavor that wasn't unpleasant, but a little strong. My experiment with smoked salmon wasn't a huge success, but it wasn't a flop either...it IS edible! I'm kicking myself for not remembering to buy some bagels.

Here's what I learned from the experiment:
1) Smoking fish is easy.
2) Trim the pieces of fish before they go into the smoker so that they are of even thickness. (No dried out ends!)
3) Experiment with different woods for smoking to see if a more subtle, complex flavor is possible.


Let's not forget about the gravlax, which still needs time to cure.  Look for the follow-up post in 2 days!


Sunday, January 6, 2013

Where there's smoke...

...there's baby back ribs!

My brother-in-law, Drew, who is an experienced hunter, gave G.W. a most excellent Christmas present this year. A Bradley Smoker. It's a pretty nifty deal that's about as foolproof as you can get. Drew got us the smoker so that we can add another dimension to cooking game. Think smoked pheasant or elk sausage!


The smoker uses these 'bisquettes" and automatically feeds them into the burner for continual smoke with hardly any babysitting or fussing. Each bisquette is good for 20 minutes of smoke. Very, very slick.


We unpacked and assembled it today.  It was ready to roll in less than 10 minutes.Talk about easy! 


In order to get rid of any weird chemical smell from the new components, it's recommended that you season the smoker for an hour before using it for food. We loaded in some bisquettes, fired 'er up and let her go.

Here's how the bisquetts feed automatically. The one on the right is on the burner.


After 30 minutes, the heat was up over 160 degrees. The recommendation is to keep the temperature at 150 for the seasoning period, so I backed the heat down just a bit.


Once the hour was up, it was time for the test run. I chose baby back ribs for the maiden voyage. 

The little recipe booklet that came with the smoker recommends pre-cooking the ribs in the oven at 350 degrees for one hour. They cooked during the hour I had to wait for the new smoker to season.  I used a purchased rub from Cabela's...their "All-purpose" rub.

Once the ribs were done in the oven, I brushed them with some BBQ sauce, then popped them into the smoker. I used hickory bisquettes.


Then every 30 minutes, I spritzed them with some apple cider vinegar and brushed on some more BBQ sauce.


I also put some baked beans into a cast iron pan and stuck them into the smoker. They went in under the rack with the ribs so that anything that dripped off the ribs would go into the beans.

Since there was still some room, I tossed a couple of fresh jalapenos onto the rack. Why not, right?

After 2 1/2 hours in the smoker, we pulled the ribs out. They looked beautiful!


While they weren't falling off the bone, they were tender, juicy and had an amazing smoke flavor. Not bad for a first attempt! The beans, which were straight out of a can, also had a nice smokey flavor.


The jalapenos should have had more time in the smoke, but I'll use them as is in beef chili.


Next time, I think I'll smoke the ribs longer and baste/spritz more often. G.W. said he's willing to "take one for the team" and be my taste tester. What a guy, huh?


My next smoking project is salmon, trout and chicken. Stay tuned for the results!