First thing in the morning, I zipped over to the local home improvement store for some supplies. It's nice when you can drive the truck right into the garden.
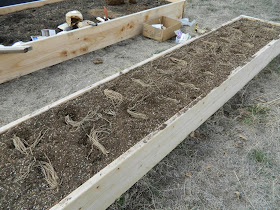
It's time to get the asparagus in the ground. This 2' x 10' bed is where my asparagus will live.
There are a few things to keep in mind before you plant asparagus. First, they are perennials and can live for a decade or more. Second, the ferns can grow amazingly tall. Sometimes as tall as six feet. You'll want to locate your asparagus patch in an area where it can happily live for years and years. Plus, you'll need to keep in mind that the tall ferns will cast shadows on other plants around them.
I chose Jersey Knight Hybrid asparagus.
This is what the bare roots look like right out of the package.
This bed started like all the others. First is some chicken wire to help keep moles and gophers at bay. Then came landscape fabric, packing paper, and cardboard.
On top of that goes the peat moss, vermiculite and compost. The compost I bought this time seemed to have a lot of peat moss in it. Since Square Foot Gardening uses a soiless mix (called Mel's Mix (MM), after Mel Bartholomew the inventor of Square Foot Gardening (SFG)) of 1/3 peat moss, 1/3 vermiculite and 1/3 compost, I cut back on the amount of pure peat moss and increased the amount of compost. Doing this helps keep the ratio true.
In SFG, you can plant more in less space. Asparagus gets one square foot for each plant. I had 22 of them to put in. I allowed a couple of extras in case a few don't grow.
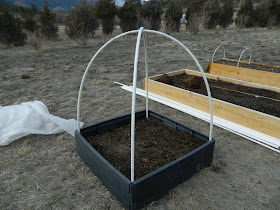
These little hoops will protect the plants until I can get some fencing up to keep the deer out. We have a very serious deer problem.
As I was out working in the garden, these girls came by apparently to see when the salad bar would be ready.
I've seen them jump the 6 foot high fence around the perennial garden, so I'm going to need something similar to the Great Wall of China to keep them out of the garden.
Today was also Allium Day. Allium is the genus of the onion family.
Red Onions
Shallots
The red onions and shallots will live together in this 3' x 3' garden bed.
The garlic is looking a little stressed from the winter. Some of the pine needle mulch was still frozen solid to the ground. But the tough little garlic shoots might be OK.
Look what was hanging out inside the HH...a lady bug!
Today's plantings in the HH included collards, Swiss chard, and green onions.
I love the Square Foot Gardening method because when it's time to plant in the spring, there's no digging or roto-tilling. The planting mix in the raised beds is always ready to go.
I don't even need a spade or a rake. My garden tools consist of a hand trowel, a hori hori and an old plastic chopstick.
What's a hori hori? It's a Japanese soil knife.
A hori hori is a formidable tool. It's a heavy, sharp, serrated steel blade that's perfect for digging, weeding and cutting. Handle with care! I sliced the ball of my thumb wide open on the blade. (A little super glue fixed my thumb right up! No time to fuss with stitches!)
The mesclun from a few weeks ago has sprouted. It's been a bit slow going. No doubt because it's been very cold AND there's been a blizzard.
A few radish sprouts are finally visible, too.
Here's the spinach sprouts
The plants that wintered over in the HH are perking up.
Sedum (an ornamental)
Garlic chives
Yarrow
Echinacea
Two varieties of mint
They are 10' sections of Schedule 40 PVC. I'm giving some thought to cutting each section in half, then using a cross connection to join the sections at the top. I think it will make it look nicer. I'll fasten deer block fencing to the PVC. It's tall enough that I can grow things like peppers and eggplants under there.
Just as I got finished with all of this, it began to rain. Yippee! We need moisture badly.
Stay tuned for my next project...starting seeds indoors.


No comments:
Post a Comment