Pages

Tuesday, April 22, 2014

Sprouts


The baby peeps are huge!  


And cute!  


But, meanwhile back at the ranch...

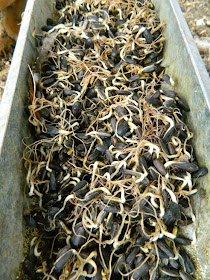
My experiment with sprouting sunflower seeds for the Team was mostly a success. The seeds sprouted nicely.  


But as far as the Team is concerned, the jury is still out on how yummy the sprouts are. They love sunflower seeds but are now disconcerted by the things growing out of them. They try to separate sprout from seed and only eat the seed part. Hopefully, they'll get it figured out. 

(UPDATE: they eventually ate all of the sprouts. So I guess they decided it tasted "yummy".


Sprouting is a very efficient way to grow food for the Team. One pound of sunflower seeds yields two to three pounds of sprouts in about a week. Not a bad return!

I use this old tub that used to have a mineral supplement for the horses as my sprouting container.  

Soak the seeds overnight, then drain off the water.  

Cover the wet seeds with something...newspaper or a lid. Then check it every few days to see if it's looking dry. If so, add enough water to keep the seeds moist but not so much water that the seeds are floating.

When the sprouts are about an inch long you can feed them to the chickens. 

Or, you can uncover them and put them in a sunny place for another few days. This will allow the sprouts to grow bigger and get green. 

If temperatures are chilly, the seeds take a lot longer to sprout. Be patient! 

One note of caution, I have heard that some sunflower seed has been treated with something that prevents sprouting. I think that's the variety used in bird feeders. Just to be certain, read the bag before you buy any that you intend to sprout.

Have you tried sprouting seeds to feed to your flock? What seeds? How did it turn out?


Sunday, April 20, 2014

Let's Get Growing!

Whew!  Busy couple of days here. I'm almost afraid to jinx it by saying it, but I think spring is here.

Some wildflowers are blooming.


The hummingbirds are back. Haven't been able to catch them in a photo, though.

Last year on May 1, the hummingbirds were probably regretting being here. Poor things had to weather a late-season blizzard.


Things are sprouting in the garden.

Garlic

Red onions

Spinach

Lettuce

Kale

Garlic Chives
Iris

Hollyhocks

Peony

Johnny Jump Ups
And of course these.....

It's about four weeks until the last spring frost, and time to start planting.  This weekend, I put in parsnips, tatsoi, carrots,  radishes, green onions, and beets plus more lettuce and spinach.

The gardening method I use, Square Foot Gardening, allows you to plant almost unbelievable amounts in very small spaces. It's because the soilless mix that's used instead of dirt is chock full of nutrients and you do not plant in rows.

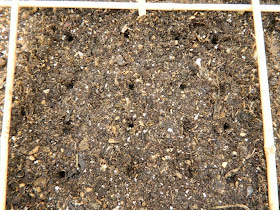
This is one of my beds with the square foot grid as a planting guide.

For example, in one square foot of garden space, you plant 16 carrots. Here's a square foot ready for carrot seeds.

One square foot will grow 9 parsnips. Or 9 beets.  I know what you're thinking...that's way too crowded. Trust me. It's not. Square Foot Gardening is a proven method and the plant density is for real!  

If you are curious about Square Foot Gardening, here is a link to the official website.
Square Foot Gardening


Click here for the "Cliff Notes" summary of what Square Foot Gardening is all about.

What is Square Foot Gardening?

A simple internet search will provide many more informative sites, too.  If you have a four foot by four foot space to build a raised garden bed, you will be able to grow more veggies in it than you ever thought possible!

Here is my indoor sprouting operation. 
There are odd reflections in the photo because I'm using foil to reflect the grow lights.

I've planted yellow pear tomatoes, Romanesco broccoli, mini red bell peppers, sage, dill, oregano, basil, cilantro, and St. John's Wort.  These will all go outside in the garden around the middle of May, which is after the danger of any frosts.

At the beginning of May, I'll do the main outdoor planting which will include two kinds of sweet corn, eggplant, two more types of tomato, cucumbers, plus a variety of herbs, beans and squash.

Between now and then I need to build trellises for the beans and squash (trying squash vertically this year) and finish the drip irrigation system.   

Tonight, the forecast is for rain. Not snow. Hooray! First time in 2014 that the precipitation will fall as a liquid and not snow!

How is your garden coming along? I'd love it if you'd share photos! Be sure to tell us where you are located.


Monday, April 14, 2014

Inspiration

My ideas for blog posts usually come about just by writing about the things we are doing here at Crossed Sabers. Life here is generally busy, so inspiration is all around me.

This past week was unusual, since it was fairly quiet at the ranch with nothing much going on. No projects. Nothing interesting happened.  No 'blog fodder' to be found.  I fell asleep last night while wracking my poor ol' brain for a good idea.

When I got up this morning, inspiration was falling from the sky. 


Here's some "inspiration". 

And over here, too.

"Inspiration" everywhere.  Up over my boots in some places!

It's April 14. Most of the country is enjoying spring weather with flowers blooming and leaves coming out on the trees.


                    Here are my spring flowers.


      There are pansies under all that snow. Poor things!

In Washington, D.C., the cherry blossoms are in full swing.

                                (Ian Livingston)

Here....not so much.


And the vegetable garden...

There is kale, lettuce and spinach sprouting inside the hoop house. Don't worry. It's fine in there.


Now don't go feeling too sorry for us. We've been under an extreme drought for the last few years, so any moisture at all, even this much of it, is a welcome sight.

This however, is not so welcome a sight. Pain in the butt is more like it.  <Sigh> Hate cleaning off the truck!


Happy Spring, y'all!


Sunday, April 6, 2014

Holy Yum! Donuts!

Shut the front door!  This morning, our lives (and waistlines) were changed forever by these little suckers! 


These donuts are scary easy to make.  They're made from canned biscuit dough. Oh, yes! Canned biscuits.  I promise you, they do NOT taste like biscuits once you're done with them.  

Here's how the magic happens:

Put about an inch and a half of canola or peanut oil in a deep skillet. Heat to 350 degrees.

While the oil is heating, crack open a can of biscuits. Although I'm guessing any variety of canned biscuit would work, I would advise steering away from the "flaky layer" variety because of the texture.

Use a donut cutter to cut out the donut hole. 

 Save those little pieces of dough to fry up for donut holes!


When your oil is at 350 degrees, drop a few of the donuts in there for a nice hot swim. My skillet could hold four at a time.  

When they're golden brown on the bottom, flip those babies over and let 'em cook another few minutes until brown on the other side.

Take the lovely, crisp-tender donuts out of the skillet and put them on a rack.  Now is when you can use your imagination.  Roll them in cinnamon sugar. Glaze them with a simple powdered sugar glaze.  Make a chocolate icing and dunk them in. 

However you dress them up, be sure to eat two of them....one for each hip and/or thigh!  They're so bad for you, but gosh they're tasty!

Oh yeah...the donut holes.  Fry them up just like you did with the donuts...

...then glaze them or what ever you like to do.  They're nice to snack on while you're waiting for more donuts to cook! 


No one would ever guess these delicious donuts were birthed from a can of biscuits. It didn't take more than 20 minutes, start to finish.  Less time than it would take you to drive to the donut shop.  

What are you waiting for? Go get a can of biscuits and change your life!